Creating a mobile or desktop interstitial ad for your website, WordPress site, mobile app, or blog has been made easy by CPAlead. An Interstitial ad will display an ad to your visitor after they click on your specified link. Based on your interstitial settings, your visitor will be required to watch the ad for 5 (or more) seconds or they will be given the option to close the ad immediately if they’re not interested. Our Interstitial ads can be completely customized right down the HTML layout and the CSS design.
If your visitor interacts with an offer inside of the interstitial ad, you will earn anywhere between 3 – 20 cents or more per click based on the value of their interaction. We must caution you however that if you click on your own offers, you will be banned – we have to stay this to protect our advertisers who pay us per click.
1. Sign In
Visit https://www.cpalead.com and click the login button in the upper right corner. If you don’t have a CPAlead account, click on the Sign Up button.

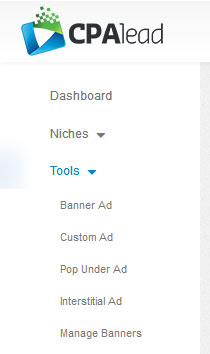
2. Navigate to Interstitial Ad
Once signed in, on the CPAlead publisher dashboard, click on the Tools menu on the left then select ‘Pop Under Ad’.
3. Select a Interstitial Template
First you will need to select a template you would like to use for your Pop Under ad. If you wish to not use a template, simply skip this step and select Pop-Under Size below.
You will see that CPAlead has 6 different interstitial templates to choose from.
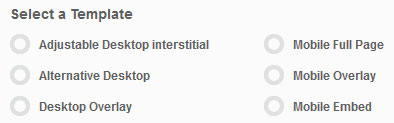
Adjustable Desktop Interstitial
This template is for desktop traffic only and the number of rows and columns CAN be adjusted using the ‘Select Interstitial Size’ drop down menu. Interstitial Ads designed using this template will display offers inside of a full window / full page. After the user closes this ad, they will be sent to the link’s destination.

Alternative Desktop
This template is for desktop traffic only and the number of rows and columns can NOT be adjusted unless you manually edit it using HTML. Interstitial Ads designed using this template will display offers inside of a full window / full page. After the user closes this ad, they will be sent to the link’s destination.

Desktop Overlay
This template is for desktop traffic only and the number of rows and columns can NOT be adjusted unless you manually edit it using HTML. Interstitial Ads designed using this template will display offers inside of an iFrame that appears above the current page in an overlay. After the user closes this ad, they will be sent to the link’s destination.

Mobile Fullpage
This template is for mobile traffic only and the number of rows and columns can NOT be adjusted unless you manually edit it using HTML. Interstitial Ads designed using this template will display offers inside of a full window / full page on mobile devices. After the user closes this ad, they will be sent to the link’s destination.

Mobile Overlay
This template is for mobile traffic only and the number of rows and columns can NOT be adjusted unless you manually edit it using HTML. Interstitial Ads designed using this template will display offers inside of an iFrame that appears above the current page in an overlay. After the user closes this ad, they will be sent to the link’s destination.

Mobile Embed
This template is for mobile traffic only and the number of rows and columns can NOT be adjusted unless you manually edit it using HTML. Interstitial Ads designed using this template will display offers inside of an iFrame that is placed on the Body of a mobile page. This template allows you to use your mobile header and footer in the design. After the user closes this ad, they will be sent to the link’s destination.

4. Select Rows and Columns
If you didn’t select the adjustable template or didn’t select a template at all, then you will want to set the number of columns and rows you would like to appear. For instance, if you select 3 columns and 4 rows, your ad will display 12 clickable offers. If you did select a template that was NOT adjustable, please don’t use this option.

5. Select iFrame Size
For templates that use an iFrame, this option will allow you to change the size of that iFrame. Please keep in mind that if you make the iFrame too small, it might show less offers than you want.

6. Set Skip Button
This option will give you the ability to use a skip button or a close button. If you choose to use a skip button, then the skip button will appear after the number of seconds you set. This allows you to force your visitor to view your ads before they are redirected to the destination of the link they clicked on. If you don’t want your visitor to wait at all, you can give them the option to close the ad immediately by selecting ‘close’.

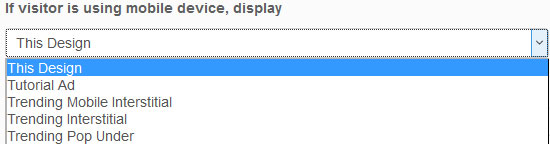
7. If visitor is using mobile device, display
This option will allow you to select another interstitial ad you designed to be displayed if the visitor is using a mobile device. You will first need to design the mobile interstitial ad, then save it. When creating the desktop version of the interstitial ad, you will see the mobile interstitial ad you designed appear in the drop down menu. Simply select the name of your mobile interstitial ad and this ad will be displayed to all mobile traffic and your current interstitial ad will be displayed to all desktop traffic.
8. Set CSS Class for Trigger Event
This is the CSS class on your website, blog, or WordPress site that will trigger the interstitial. This means all ‘a href’ links that use this specified class will trigger this interstitial.
For instance, if I wanted the interstitial to appear every time a visitor goes to my ‘About’ page on my website, I could add the class ‘pop’ to this link:
![]()
and it would look like this:
![]()
Then on my interstitial creator on CPAlead, I would set the CSS Class for Trigger to ‘pop’, like this:

You will need to add the Javascript code to make this active, but don’t worry I will detail that later.
9. Banner Name and Save
This is where you will set the interstitial Ad name so you can find it later in your ‘Manage Ads’ menu. If you don’t wish to edit the HTML or CSS of this ad, you can save your ad now.

10. Editing HTML and CSS (Optional)
If you wish to edit the HTML and CSS of the template you select or if you wish to create your own template, please refer to our Custom Ad tutorial, steps 6 and 7.
11. Place Interstitial on Website, Blog, or WordPress Site
Once you have saved your Interstitial ad, you will be redirected to the ‘Manage Ads’ menu. Here you will see all ads you have created prior and also the ad you just created. For the Interstitial Ad you just created, click on ‘Get Code’.
Now you will see a code like this displayed:
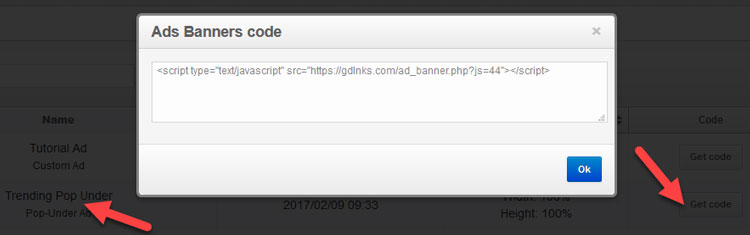
Copy this code and place it on the webpage your interstitial will appear. Next you will need to set which links trigger the interstitial by setting a CSS Class, please revisit step 8 above.
If you have set a mobile version of the interstitial to appear for mobile traffic (See step 7 above), you will need to make sure the desktop and mobile version of the interstitial are triggered on the same class. Also please note that you will only need to use the placement code of the desktop version. If your visitor is using a desktop device, they will see the desktop interstitial you designed. If your visitor is using a mobile device, they will see the mobile version you designed.
Watch our video tutorial! If you need some extra help, please watch our video tutorial below. If you still have questions, please email suggestions (@) cpalead.com. Also please like our YouTube video if you like this feature, this will encourage us to make more like it.
